Applearchives

Assigned Spaces in Lion

The target audience for this tip is probably pretty niche, but hopefully it’ll help someone else out, as I was endlessly frustrated by my iCal following me around from space to space in Lion.

With Expose and Spaces being consolidated into Mission Control in Lion, one issue I encountered was that apps that were previously designated as being assigned to “All Spaces” (in the Exposé settings in Snow Leopard’s System Preferences) continue to be assigned to All Spaces in Lion.  But, there’s no similar table in the Mission Control settings to change what space each app is assigned to.

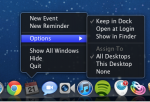
Turns out, Apple did away with that list of settings and put the preference where it makes the most logical sense — right in the dock menu:

Click and hold (or right click) on the app’s icon in the dock, go to the “Options” submenu and you’ll find an “Assign To” setting, where you can select if you’d like that app to appear on All Desktops (/Spaces), the current one that you’re in, or if you’d like to be able to freely move it around in Mission Control (that’s the None option — it has no assignment).

If you’ve found yourself in Mission Control, trying to drag and drop a window from one space to another and it’s just not cooperating, this is likely the issue you’re having.

Update 7/23/11: To be clear, this option only appears when you actually have multiple spaces.  To make a new space in Lion, open up Mission Control and hover your cursor in the top right — clicking the transparent icon of your desktop background will open a new blank space.  But most of the time you’re not just making an empty space, so new in Lion you can drag any window in Mission Control up to the top row (with the rest of the spaces / full-screen apps) to create a new space with just this window.  Really handy.

Using Gmail labels in Lion’s Mail.app (Updated 2x)

Prior to Lion, I had been using Sparrow as my primary email client because all of my primary email addresses are Gmail-based, and Sparrow was written from the ground up for Gmail (and added in MobileMe and IMAP support later).  Apple’s Mail.app in Snow worked with Gmail, it just didn’t work well – labels were relegated to the depths of the sidebar and thus fairly inaccessible without totally cluttering your Mail sidebar.

Lion brings a significant revamp of Mail, with tons of new features that makes managing your mail much easier than in the past.  One of these niceties is the addition of the Favorites Bar, which will feel instantly familiar if you use the Bookmarks Bar in Safari. It holds quick links to your Inbox, Sent Mail, and any other mail folder you want access to:

You can add mail folders to the Favorites Bar by dragging and dropping them from the Mailbox List (if you’re not seeing it, click the “Show” button that hangs out on the left side of the Favorites Bar) right into the Favorites Bar.  And since Gmail labels show up as folders in Mail (look for the name of your Gmail account near the bottom of the Mailbox List, and if necessary, hover your cursor over the list item and click “Show”), you can add your labels to the favorites bar.

Hooray!

Update 7/23/11:

Adding labels to messages

A glaring omission from my original post: how to add labels to messages.  There are a few options:

  • Option 1 – Contextual Menu: Right click / CTRL+click the message you want to label, choose “Copy To” and select the label (again, looks like a folder here) you want to add to the message.  A handy trick here is the “Copy to Folder Again,” where folder is the last label you applied (with the handy keyboard shortcut: Option + Command + T).
  • Option 2 – Menu Item: Same as above, but use the “Message” menu from the menu bar.
  • Option 3 – Toolbar Item: If you’re more of a toolbar person (I am), add the “Copy to Folder” button to the toolbar. To customize your toolbar in Mail, just like in any good Mac App with a toolbar, choose the View menu -> Customize Toolbar and drag the icon to your toolbar.

Update 7/24/11:

One other way to add labels:

Option 4 – Drag & Drop: If you’ve got your mailbox list visible (leftmost panel with all your folders), you can drag & drop a message into the appropriate folder. Make sure to hold down the Option key while you drag & drop to ensure you copy to the label folder instead of moving it there!

Smart Folders a first class citizen in Lion

Smart Folders have always been a feature of (Mac) OS X that I’ve wanted to use.  On paper, they sound perfect: a custom, predefined search that appears just like any other folder in the Finder.  But that’s just the problem – in Leopard and Snow Leopard, the contents of the Smart Folder would not display in Column view. Instead, a preview was given – basically, the Finder in Column view treated Smart Folders like files. Dumb files.

Thankfully, that has been remedied in Lion. Smart Folders now work just like any other folder:

And they’re fast.  Really fast.  I’ve noticed all of Spotlight to be markedly faster in Lion (so, if you’ve just upgraded to Lion and you’re waiting for your Spotlight to reindex, it’s worth it), and that definitely carries through to opening and manipulating Smart Folders.

In fact, they’re so fast, a Smart Folder is now the default folder when you open a Finder window in Lion — All My Files.  This is just a smart folder querying all your drives for all of your files: PDFs, Images, Movies, Spreadsheets, and so on.  As others have mentioned, the power here really comes when you start refining the search using the Finder’s search bar, searching not just file names, but contents as well.

Smart Folders were Apple’s first attempt to change the way that the average person manages files on their Mac.  With Lion, they’ve really become a suitable accompaniment to the ragged folder hierarchy that we’ve had to deal with, allowing us to group files and folders from anywhere on our machines into one “folder.” That said, I’m not quite ready to dump all my files into one folder and just use search queries to find what I’m looking for.  Not yet, anyways.